

Web servers and reverse proxies are powerful tools in the DevOps arsenal, providing a range of benefits for web application performance, security, and infrastructure management.
What is Nginx?
Nginx is a popular open-source web server software that also functions as a reverse proxy, load balancer, and HTTP cache. It is designed to be lightweight, fast, and scalable, making it a popular choice for high-traffic websites and applications.
The web server serves all the static files i.e. the HTML, CSS, and Javascript files to the client i.e. the user.
Nginx can be used as a standalone web server or in combination with other web servers like Apache. It is also commonly used as a reverse proxy in front of application servers like Node.js or Ruby on Rails, to improve performance and scalability by distributing incoming traffic across multiple backend servers.
Nginx Architecture

The architecture of Nginx consists of a master process and multiple worker processes, which enable the server to handle large amounts of traffic while distributing the load among multiple child processes.
For example, if a website is hosted on a specific port and experiences a sudden surge in traffic, the website may become overloaded and crash. However, if the website is served through Nginx, the load is distributed among multiple worker processes, preventing the server from becoming overwhelmed and allowing the website to function smoothly.
In summary, Nginx's architecture is built to deliver high performance and scalability, while remaining flexible and simple to configure.
Reverse Proxy with Nginx
A reverse proxy is a server that receives client requests and forwards them to the appropriate backend server(s) to handle the request. Reverse proxies are commonly used in DevOps to improve web application performance, increase security, and simplify infrastructure management.
Suppose there is a website running on a particular port on the local host and you want it to run on the production without violating security then we can use the reverse proxy to create a bridge and make the port accessible to all the users.
Load Balancing with Nginx
Load balancing with NGINX involves distributing incoming requests across multiple backend servers to optimize resource utilization and prevent overloading.
NGINX can be used to balance the load for various types of applications, including HTTP, HTTPS, TCP, and UDP. It can also be used to load balance between servers located in different geographical locations.
Url redirection and caching
URL redirection is the process of forwarding one URL to another.
Caching with NGINX involves storing frequently accessed static content so that it can be served more quickly.

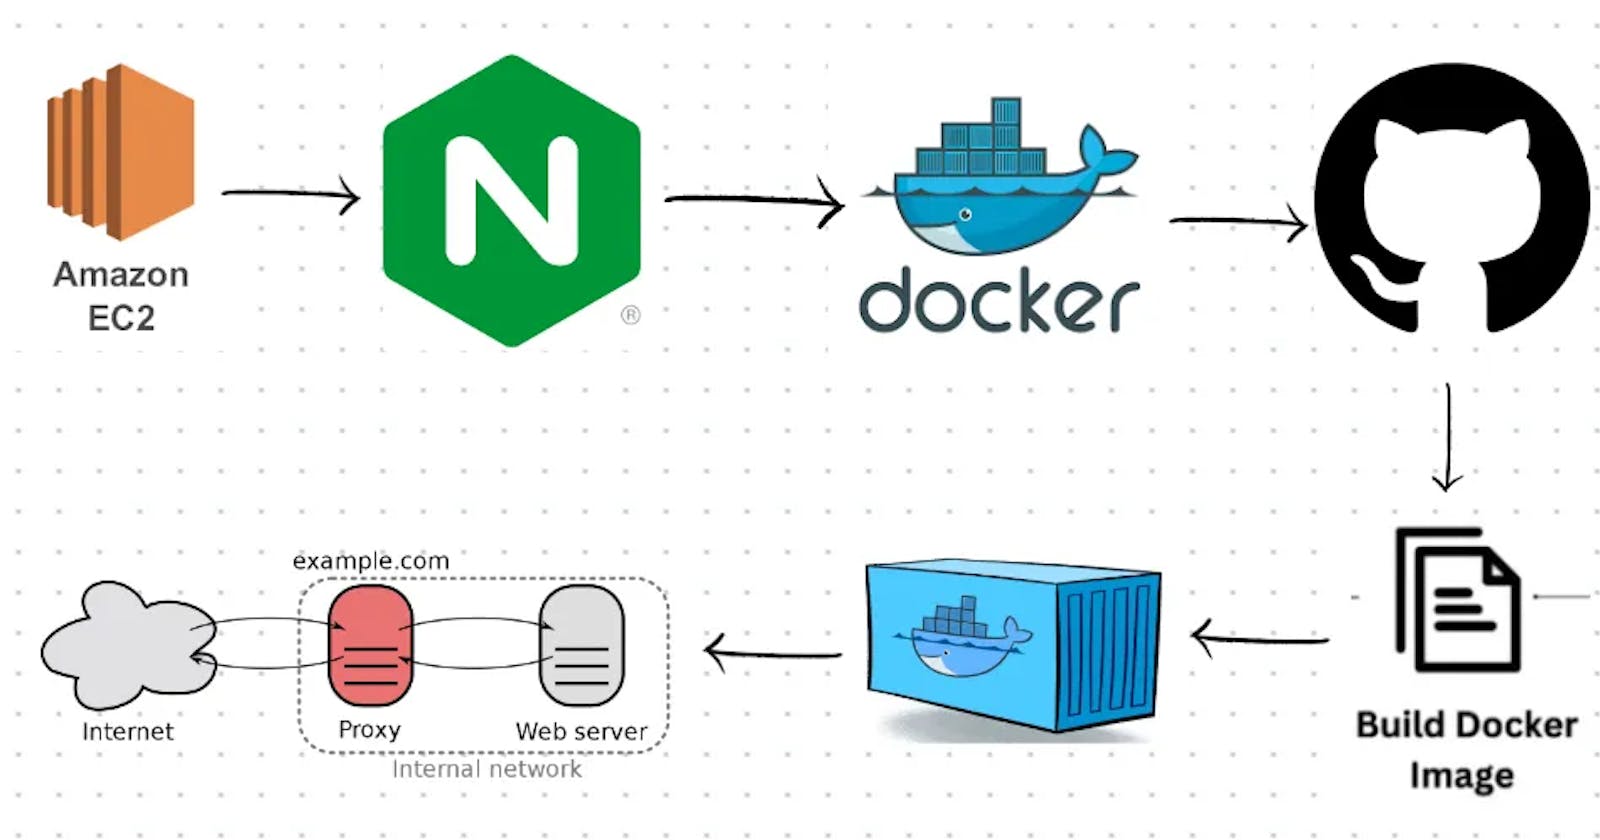
To deploy a web application using Nginx server and Reverse Proxy on AWS, you will need the following requirements:
AWS account: You need to create an AWS account to access the AWS services.
EC2 instance: You need to create an EC2 instance on which you will deploy your web application. You can select the instance type based on your application requirements.
Security group: You need to create a security group to allow inbound traffic to the EC2 instance on ports 80 (HTTP) and 443 (HTTPS).
Nginx installation: You need to install Nginx on the EC2 instance. You can install it using the package manager available on your instance's operating system.
Let's install Nginx and see its usage
sudo apt-get update
sudo apt install nginx
sudo service nginx status
sudo service nginx restart

Nginx by default runs on port 80, and the above web document is served. This page is been accessed from /var/www/html.
You can check the Nginx configuration files here:

Clone the GitHub repository using the command:
git clone https://github.com/VishalPraneeth/django-notes-app.git

Now to install docker, use the command:
sudo apt install docker.io
sudo systemctl status docker

But you can't build images or run containers until the user doesn’t have access to the docker. So to give permissions use:
sudo usermod -aG docker $USER
When you add a user to the docker group, you give that user permission to run Docker commands without needing to use sudo. This can make working with Docker more convenient and efficient, especially when you need to run Docker commands frequently.
After this reboot the server.
sudo reboot
In the same GitHub repo, we have DockeFile. This is a Dockerfile used to build a Docker image for a Python web application. The base image is Python 3.9. The working directory is set to "/app/backend" and the requirements.txt file is copied to this directory. The pip command is then used to install the dependencies listed in requirements.txt. The rest of the files in the current directory are also copied to "/app/backend". Port 8000 is exposed, which is the default port used by the Django web framework. The CMD instruction specifies the command to run when a container is started from this image. In this case, it runs the Django development server on all network interfaces (0.0.0.0) on port 8000.
FROM python:3.9

WORKDIR /app/backend

COPY requirements.txt /app/backend
RUN pip install -r requirements.txt

COPY . /app/backend

EXPOSE 8000

CMD python /app/backend/manage.py runserver 0.0.0.0:8000
Build the Docker image using the command:
docker build -t notes-app .

Once the image has been built successfully, run the container using the command:
docker run -d -p 8000:8000 notes-app:latest

To allow clients to access the application, we aim to implement the reverse proxy concept. Therefore, the Nginx configuration needs to be modified. To do so, navigate to /etc/nginx/sites-enabled.
Next, we will modify the default configuration file to update the settings.

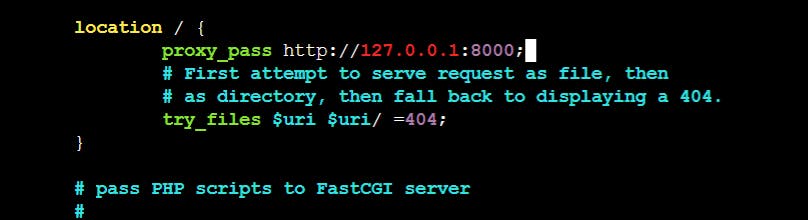
And after restarting nginx we can see the app running on localhost

The web application is now accessible, but the functionality to update or delete notes is not available because the backend code does not support storing such data. To resolve this, we need to transfer all static files of the application to the Nginx root folder located at /var/www/html. This will enable access to the files necessary for proper application functionality.
Go to the below-given path to find the folder containing static files and copy to /var/www/html in recursive order
cd django-notes-app/mynotes/build/
sudo cp -r * /var/www/html/

Now we need to update the location /api for the backend page of the server. Go to /etc/nginx/sites-enabled location and update the code.

Once you restart Nginx, you can visit the notesapp in your browser and add notes to it successfully. This concludes the deployment of our web application using the Nginx server.

If you have got the same output as mine, Yu did it🔥

I'm pinning the GitHub repo link, you can go through the code and understand it.
Guys, you can connect with me on LinkedIn and GitHub
Thank you for staying till the end of this project, and feedback is appreciated on my blog if you loved it. And yes, All the Best for your project….👍✨