Deploying a WordPress application(Full stack) on AWS using EKS.

My name is Vishal M. I'm a Cloud-native DevOps Engineer and a tech blogger. As an undergraduate CSE student, I bring a fresh perspective and a passion for learning and innovation. I specialize in automating, configuring, and deploying applications on cloud environments, utilizing tools like GitOps, CI/CD pipeline, and Hashicorp Terraform. With proficiency in AWS services and Linux/Unix administration, I ensure optimal system performance and provide infrastructure support. I'm well-versed in DevOps tools like Git, Docker, Kubernetes, Jenkins, and Prometheus. Beyond my technical skills, I have a strong work ethic, am a self-starter, and enjoy collaborating as part of a team.
I actively contribute to open-source projects and share my knowledge through tech blogging.
WordPress is a common Content Management System for building websites and blogs. Scaling WordPress can be difficult, especially in the cloud due to the shared file system requirement for uploads, plugins, and themes.
This blog follows the WordPress deployment for putting the entire WordPress codebase in an Elastic File System (EFS) mount.
Problem Statement Objective:
Creating a Kubernetes cluster on AWS using EKS and integrating it with EC2, ELB, EFS, and VPC.
Deploying WordPress and MySQL on EKS. Integrating Prometheus and Grafana using helm to monitor the Setup.

So, without any further ado, let's get started.
Follow me through the entire journey where I'd be showing you the implementation of the complete project.
Steps:
Step 1: Create an IAM role on AWS and configure it on your system using AWS CLI.

Step 2: Using terraform code to set up the infrastructure.
provider "aws" {
  region                  = "ap-south-1"
  profile                  = "EKS"
}


resource "aws_iam_role" "eks_cluster" {
  name = "ViRocluster"

  assume_role_policy = <<POLICY
{
  "Version": "2012-10-17",
  "Statement": [
    {
      "Effect": "Allow",
      "Principal": {
        "Service": "eks.amazonaws.com"
      },
      "Action": "sts:AssumeRole"
    }
  ]
}
POLICY
}

resource "aws_iam_role_policy_attachment" "AmazonEKSClusterPolicy" {
  policy_arn = "arn:aws:iam::aws:policy/AmazonEKSClusterPolicy"
  role       = aws_iam_role.eks_cluster.name
}

resource "aws_iam_role_policy_attachment" "AmazonEKSServicePolicy" {
  policy_arn = "arn:aws:iam::aws:policy/AmazonEKSServicePolicy"
  role       = aws_iam_role.eks_cluster.name
}


# cluster creation
resource "aws_eks_cluster" "aws_eks" {
  name     = "ViRocluster"
  role_arn = aws_iam_role.eks_cluster.arn

  vpc_config {
    subnet_ids = ["subnet-0d599dd199f636f92","subnet-0b2d7f33ad355e327","subnet-0c6e0383cef9452f6"]
  }

  tags = {
    Name = "myeks"
  }
}

resource "aws_iam_role" "eks_nodes" {
  name = "eks_ng_gp"

  assume_role_policy = <<POLICY
{
  "Version": "2012-10-17",
  "Statement": [
    {
      "Effect": "Allow",
      "Principal": {
        "Service": "ec2.amazonaws.com"
      },
      "Action": "sts:AssumeRole"
    }
  ]
}
POLICY
}

resource "aws_iam_role_policy_attachment" "AmazonEKSWorkerNodePolicy" {
  policy_arn = "arn:aws:iam::aws:policy/AmazonEKSWorkerNodePolicy"
  role       = aws_iam_role.eks_nodes.name
}

resource "aws_iam_role_policy_attachment" "AmazonEKS_CNI_Policy" {
  policy_arn = "arn:aws:iam::aws:policy/AmazonEKS_CNI_Policy"
  role       = aws_iam_role.eks_nodes.name
}

resource "aws_iam_role_policy_attachment" "AmazonEC2ContainerRegistryReadOnly" {
  policy_arn = "arn:aws:iam::aws:policy/AmazonEC2ContainerRegistryReadOnly"
  role       = aws_iam_role.eks_nodes.name
}

resource "aws_eks_node_group" "node1" {
  cluster_name    = aws_eks_cluster.aws_eks.name
  node_group_name = "ng-1"
  instance_types   =["t2.micro"]
  node_role_arn   = aws_iam_role.eks_nodes.arn
  subnet_ids      = ["subnet-0d599dd199f636f92", "subnet-0b2d7f33ad355e327","subnet-0c6e0383cef9452f6"]
  disk_size       = 40
  remote_access {
   ec2_ssh_key = "vishal-eks"
   source_security_group_ids = ["sg-043f6cd749693e8c1"]
  }
  scaling_config {
    desired_size = 1
    max_size     = 1
    min_size     = 1
  }
  depends_on = [
    aws_iam_role_policy_attachment.AmazonEKSWorkerNodePolicy,
    aws_iam_role_policy_attachment.AmazonEKS_CNI_Policy,
    aws_iam_role_policy_attachment.AmazonEC2ContainerRegistryReadOnly,
  ]
}
resource "aws_eks_node_group" "node2" {
  cluster_name    = aws_eks_cluster.aws_eks.name
  node_group_name = "ng-2"
  instance_types   =["t2.micro"]
  node_role_arn   = aws_iam_role.eks_nodes.arn
  subnet_ids      = ["subnet-0d599dd199f636f92", "subnet-0b2d7f33ad355e327","subnet-0c6e0383cef9452f6"]
  disk_size       = 40
  remote_access {
   ec2_ssh_key = "vishal-eks"
   source_security_group_ids = ["sg-043f6cd749693e8c1"]
  }
  scaling_config {
    desired_size = 1
    max_size     = 1
    min_size     = 1
  }
  depends_on = [
    aws_iam_role_policy_attachment.AmazonEKSWorkerNodePolicy,
    aws_iam_role_policy_attachment.AmazonEKS_CNI_Policy,
    aws_iam_role_policy_attachment.AmazonEC2ContainerRegistryReadOnly,
  ]
}
resource "aws_eks_node_group" "node3" {
  cluster_name    = aws_eks_cluster.aws_eks.name
  node_group_name = "ng-3"
  instance_types   =["t2.micro"]
  node_role_arn   = aws_iam_role.eks_nodes.arn
  subnet_ids      = ["subnet-0d599dd199f636f92", "subnet-0b2d7f33ad355e327","subnet-0c6e0383cef9452f6"]
  disk_size       = 40
  remote_access {
   ec2_ssh_key = "vishal-eks"
   source_security_group_ids = ["sg-043f6cd749693e8c1"]
  }
  scaling_config {
    desired_size = 1
    max_size     = 1
    min_size     = 1
  }
  depends_on = [
    aws_iam_role_policy_attachment.AmazonEKSWorkerNodePolicy,
    aws_iam_role_policy_attachment.AmazonEKS_CNI_Policy,
    aws_iam_role_policy_attachment.AmazonEC2ContainerRegistryReadOnly,
  ]
}

resource "aws_efs_file_system" "efs" {
  creation_token = "efs-token"

  tags = {
    Name = "EKS"
  }
}

resource "aws_efs_mount_target" "subnet1" {
  file_system_id = aws_efs_file_system.efs.id
  subnet_id = "subnet-0d599dd199f636f92"
  security_groups = ["sg-043f6cd749693e8c1"]
}

resource "aws_efs_mount_target" "subnet2" {
  file_system_id = aws_efs_file_system.efs.id
  subnet_id = "subnet-0b2d7f33ad355e327"
  security_groups = ["sg-043f6cd749693e8c1"]
}

resource "aws_efs_mount_target" "subnet3" {
  file_system_id = aws_efs_file_system.efs.id
  subnet_id = "subnet-0c6e0383cef9452f6"
  security_groups = ["sg-043f6cd749693e8c1"]
}

resource "aws_efs_access_point" "efs_ap" {
  file_system_id = aws_efs_file_system.efs.id
}
The 1st node group will contain two EC2 instances of type t2.micro and the 2nd node group will contain min two and max three EC2 instances of type t2.micro and that node group is a spot instance type i.e it will automatically create the instance when a client tries to access the web server.
The infrastructure is managed on a VPC with EFS integrated with the EC2 instances.
Commands to execute:
terraform init
terraform validate
terraform plan
terraform apply
The EKS cluster has been created successfully🥳

The EC2 instances and other resources are also created.


Congratulations🎉, Most of the part is already done… The cluster has been created!!
We now need Kubernetes manifest files to deploy the cluster.
In case you're wondering what are these files

RBAC:- Role-based access control (RBAC) is a method of regulating access to a computer or network resources based on the roles of individual users within your organization. RBAC authorization uses the rbac.authorization.k8s.io . API group to drive authorization decisions, allowing you to dynamically configure policies through the Kubernetes API.
EFS Provisioner:- The EFS Provisioner is deployed as a Pod that has a container with access to an AWS EFS file system. The container reads a ConfigMap containing the File system ID, the Amazon region of the EFS file system, and the name of the provisioner.
Storage class:- A StorageClass resource is defined as, whose provisioner attribute determines which volume plugin is used for provisioning a PersistentVolume (PV). In this case, it specifies the EFS Provisioner Pod as an external provisioner by referencing the value of the provisioner name key in the ConfigMap.
WordPress and MySQL files are the default manifest files available which you need to modify according to your cluster details.
Now start your Docker and Minikube to continue the deployment.

You can create each deployment separately by executing:
kubectl apply -f filename.yml
But for making this simpler, I've written a Kustomize file that will create all deployments with just one command, by changing the directory into the folder containing all these .yml files, and executing this command.
kubectl create -k .
The clusters are getting deployed, It'll take some time for creating the pods and services. Grab a cup of coffee and enjoy it until then.

Step 3: After all the pods are created. Connect to the EC2 instance on WebUI and execute the following commands:
sudo su -
yum install amazon-efs-utils -y
LoadBalancer gives a Public DNS so that the outside world can connect to our pods through the load balancer and isolate our pods. Based on the traffic &load, It dynamically creates the nodes. I am Copying our load balancer IP on my browser to get connected with WordPress.
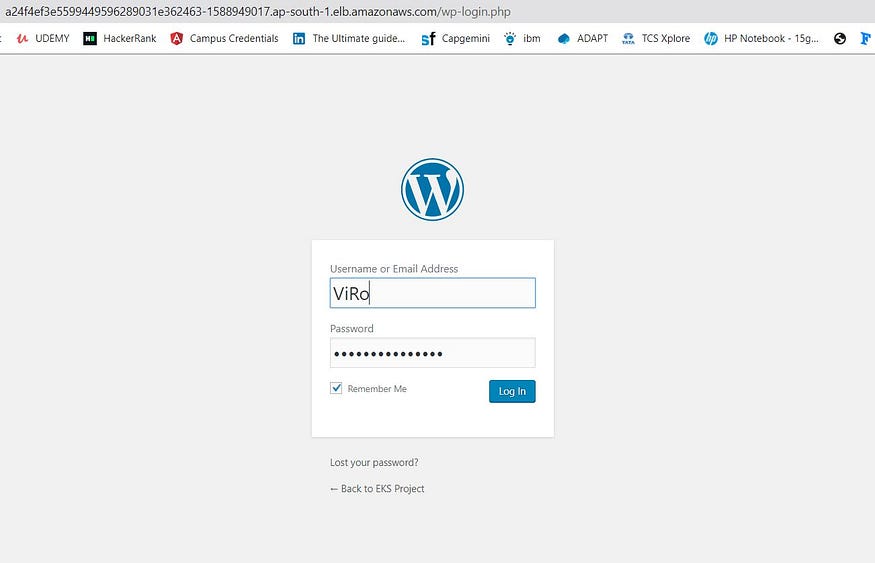

If you have got the same output as mine, Yu did it🔥.

Further to monitor the deployment, you need to install Prometheus and Grafana on your system. You can install and start them directly as a service on the Linux machines or just configure them using helm.
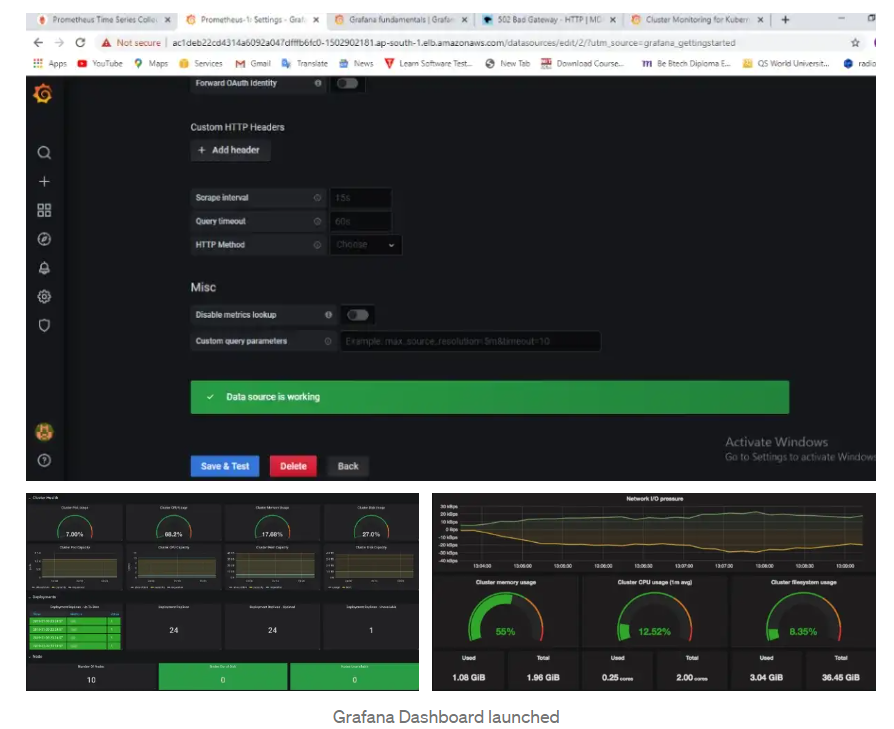
This is the final output of the dashboard.
I'm pinning my GitHub repo link, you can go through the code and understand it.
Guys, you can connect with me on LinkedIn and GitHub
Thank you for staying till the end of this project, Do Star my Repo, and feedback is appreciated on my blog if you loved it. And yes, All the Best for your project….👍✨

If you run an organization and want me to write content for you, please do connect with me 🤝.


