AWS/DevOps Project "DataFlowXpress": Streamlined Data Pipelines for Modern Analytics


Services that will be used in this project:
AWS Lambda: It is a serverless computing service offered by AWS. It allows us to run the code/application without having to manage or provision the server. We just have to upload the code (Lambda Function) and specify the trigger which invokes our code.
AWS S3: Abbreviated as Simple Storage Service allows object-level storage of data. Which offers to store various types of data, including files, images, videos, and backups. It is commonly used as a data lake or a central repository and offers features like versioning, access control, data encryption, and lifecycle management to meet different storage needs.
AWS Glue: It is a fully managed extract, transform, and load (ETL) service. It integrates with other AWS services, making it easier to build end-to-end data processing pipelines.
Amazon SNS: It is a messaging service offered by AWS. It enables you to send and receive notifications from your applications or services. SNS is commonly used for real-time communication, event-driven architectures, and triggering actions.
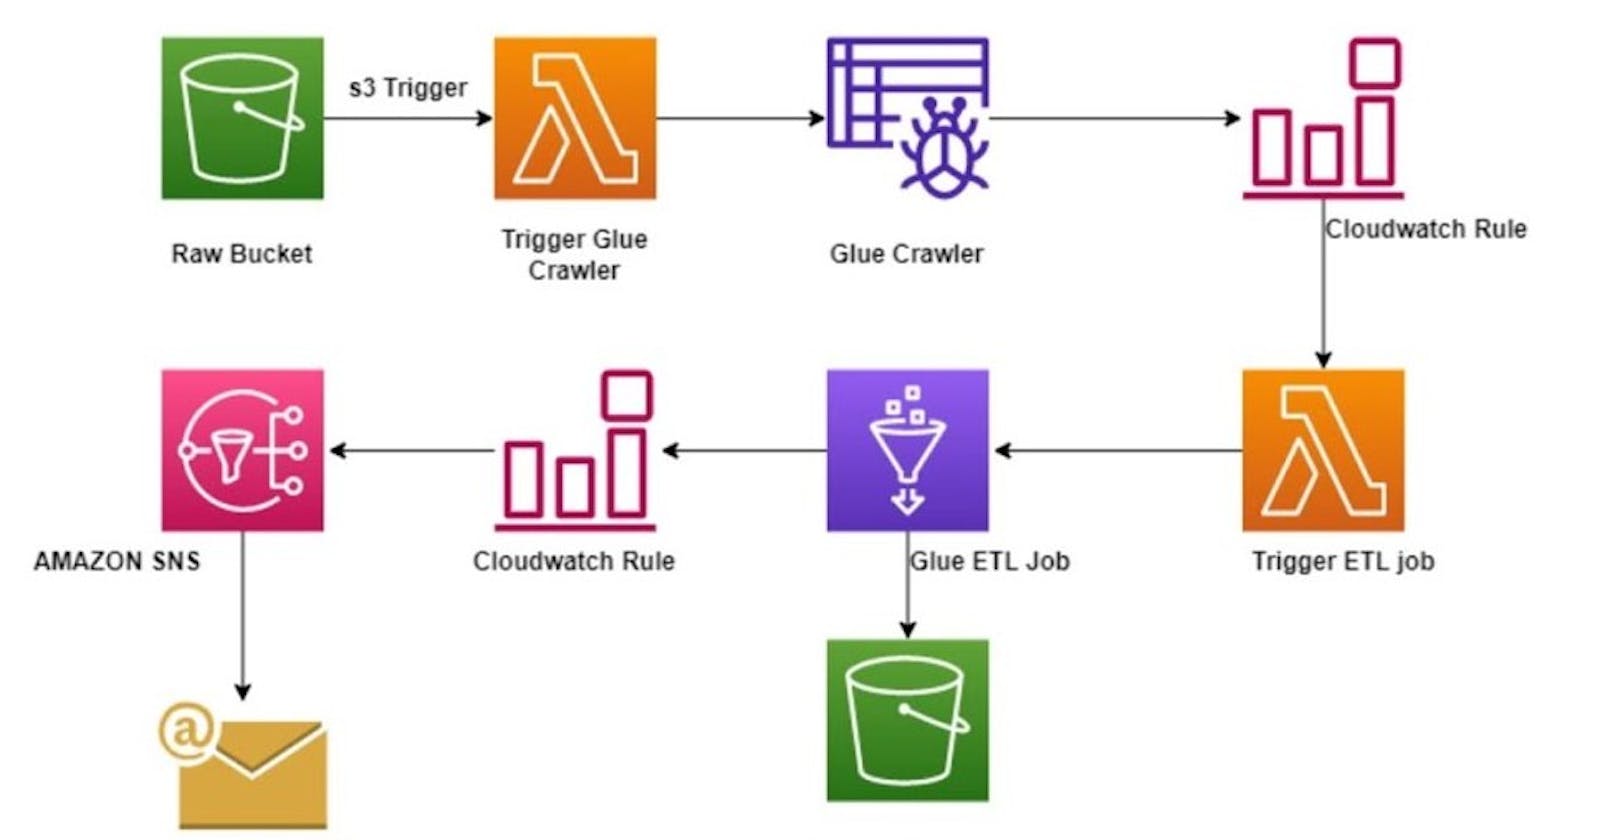
The architecture consists of a serverless data processing pipeline using AWS services, including S3, Lambda, Glue, CloudWatch, and SNS. The pipeline aims to automate the process of ingesting, transforming, and storing data.
Architecture in simple terms:
Raw data is uploaded to an S3 bucket, triggering a Glue crawler that catalogs data sources. A Lambda function is then triggered, initiating a Glue ETL job for data transformation. The transformed data is stored in another S3 bucket, and an email notification is sent via SNS using CloudWatch rules.
Steps to implement the pipeline
Create the S3 Bucket and Folders
Create an S3 bucket named "serverlessgluelambdacloudwatch."
Inside the bucket, create two folders: "csv_data" for storing CSV data and "parquet_data" for storing Parquet data.
Create the Lambda Function
Develop a Lambda function in Python 3.9 to trigger the Glue crawler. Name it "serverless_trigger_lambda."
Ensure the Lambda function has the necessary permissions to interact with Glue and S3. Attach the appropriate IAM roles for Glue access and S3 access.
  import json
  import boto3
  glue=boto3.client('glue');

  def lambda_handler(event, context):
      # TODO implement
      print(event)
      response = glue.start_crawler(
      Name='serverlesstrigger'
      )
      return {
          'statusCode': 200,
          'body': json.dumps('Hello from Lambda!')
      }
Configure the Lambda Trigger
Add a trigger to the Lambda function using Amazon S3 as the event source.
Select the S3 bucket "serverlessgluelambdacloudwatch" as the source for the trigger.
Set Up the Glue Crawler
Create a Glue crawler named "serverlesstrigger".
Configure the Glue crawler to use the S3 bucket "serverlessgluelambdacloudwatch" as the data store path.
Create an IAM role with necessary policies for Glue, S3, and CloudWatch access, and attach it to the Glue crawler.
Create the Glue Database
- Add a new database named "demoglue" in AWS Glue. For this demonstration, we will stick to default configurations.
Deploy the Lambda Function
Deploy the Lambda function to AWS using the AWS Management Console or AWS CLI.
Ensure the Lambda function is associated with the IAM role that has Glue and S3 access.
Create the Second Lambda Function (triggergluejob)
Develop another Lambda function in Python 3.9 named "triggergluejob."
Attach the necessary IAM roles with S3 and Glue access policies to the Lambda function.
Edit the basic settings of the Lambda function to add a timeout of approximately 2 minutes to ensure efficient execution.
Create the Glue Job
Develop a Glue job named "serverlessgluejob" with version Spark and Python.
Edit the script for the Glue job and save it. The script defines the data transformation logic according to our requirements.
  import sys
  from awsglue.transforms import *
  from awsglue.utils import getResolvedOptions
  from pyspark.context import SparkContext
  from awsglue.context import GlueContext
  from awsglue.job import Job

  ## @params: [JOB_NAME]
  args = getResolvedOptions(sys.argv, ['JOB_NAME'])

  sc = SparkContext()
  glueContext = GlueContext(sc)
  spark = glueContext.spark_session
  job = Job(glueContext)
  job.init(args['JOB_NAME'], args)

  datasource0 = glueContext.create_dynamic_frame.from_catalog(database = "demoglue", table_name = "csv_data", transformation_ctx = "datasource0")

  datasink4 = glueContext.write_dynamic_frame.from_options(frame = datasource0, connection_type = "s3",
  connection_options = {"path": "s3://serverlessgluelambdacloudwatch/parquet_data/"}, format = "parquet", transformation_ctx = "datasink4")
  job.commit()
Set Up CloudWatch Rule for Glue Crawler State Change
Create a CloudWatch rule with the service name "Glue" and event type "glue crawler state change."
Specify the state change as "succeeded" to trigger the rule when the Glue crawler job successfully completes.
Add Trigger for CloudWatch Rule
Add the Lambda function "triggergluejob" as the target for the CloudWatch rule.
Alternatively, you can use Amazon SNS as the target to receive notification emails on successful Glue crawler job completion.
  # for lambda trigger
  {
      "source": [
        "aws.glue"
      ],
      "detail-type": [
        "Glue Crawler State Change"
      ],
      "detail": {
        "state": [
          "Succeeded"
        ],
        "crawlerName": [
          "serverlesstrigger"
        ]
      }
    }
#for sns trigger { "source": [ "aws.glue" ], "detail-type": [ "Glue Job State Change" ], "detail": { "jobName": [ "serverlessgluejob" ], "state": [ "SUCCEEDED" ] } }
GitHub repo that contains all the code: "DataFlowXpress project"
Verification:
To verify the success of the serverless data processing pipeline, simply upload a CSV file to the "csv_data" folder within the S3 bucket named "serverlessgluelambdacloudwatch." The Glue crawler will automatically detect the new data and update the Glue Data Catalog accordingly. Next, the CloudWatch rule will trigger the "triggergluejob" Lambda function, initiating the execution of the "serverlessgluejob" Glue job. This Glue job will process and transform the data as per the defined script, and the resulting transformed data will be stored in the "parquet_data" folder of the same S3 bucket.

Conclusion:
By following the steps outlined in this blog, we successfully built a robust and automated serverless data processing pipeline on AWS. The pipeline utilizes Lambda functions, Glue crawlers, Glue jobs, and CloudWatch rules to ingest, transform, and store data seamlessly. The serverless architecture enables scalability, cost-efficiency, and ease of maintenance, allowing data engineers and analysts to focus on valuable insights rather than managing infrastructure. With this serverless data pipeline in place, organizations can efficiently process and analyze data, making data-driven decisions and gaining valuable business insights.
Thank you for staying till the end of this project, Do Star my Repo, and feedback is appreciated on my blog if you loved it. And yes, All the Best for your project….👍✨